Author: wililupy

  • Livepatching the Kernel in Ubuntu 16.04 LTS

    Hello everyone and Happy New Year! I hope 2017 has started great for everyone out there.

    So I have been playing around with Canonical’s Livepatch service on my Ubuntu 16.04 servers and I have to say, it is pretty slick. I run two KVM hosts that run various servers and containers so that I can do my job. In fact, this web server runs as a KVM on one of my hosts. Since I can’t typically run kernel updates and reboot when ever I feel like since I have other work loads running on these servers, Canonical Livepatch answers this problem for me.

    How it works is pretty simple. When a security patch for the Kernel comes out, this service downloads the patch and installs it in the running kernel on my system WITHOUT HAVING TO REBOOT MY SERVER!!! That is amazing!! I get the security update to patch and make my system secure and I don’t have to schedule a maintenance window and bring down 20+ VM’s and 100+ containers, I can just update the host and BAM! All my containers and my hosts are updated, no reboot, no downtime. I still have to touch all my KVM’s, but that is the way when you run VM’s.

    So you want to try this out? It’s pretty simple to setup. First, it only works on Ubuntu 16.04 LTS. This “should” change to be available in 14.04 but as of when I wrote this, it was still not yet available on 14.04.

    The Kernel Livepatch is a snap application, making use of snaps on the system. This makes it even easier to install and update. To install on your system, it is as simple as:

    sudo snap install canonical-livepatch

    This will pull down the snap application and install and start it. Now, you have to enable the service. You need to go to https://auth.livepatch.canonical.com to sign up for the service. Regular Ubuntu users are authorized up to 3 machines to get Livepatches for. If you need more, you can purchase them via support for your systems. Once you are signed up, you will have a token that you use to add your systems.

    You then run:

    sudo canonical-livepatch enable <TOKEN>

    This will setup livepatch. To see it work, simply run

    canonical-livepatch status --verbose

    and you will get the following output:

    client-version: "6"
    machine-id: --REMOVED--
    machine-token: --REMOVED--
    architecture: x86_64
    cpu-model: Intel(R) Xeon(R) CPU           E5645  @ 2.40GHz
    last-check: 2017-01-11T15:21:36.477627539-08:00
    boot-time: 2016-11-28T09:16:56-08:00
    uptime: 1062h5m33s
    status:
    - kernel: 4.4.0-47.68-generic
      running: true
      livepatch:
        checkState: checked
        patchState: applied
        version: "15.1"
        fixes: |-
          * CVE-2016-7425
          * CVE-2016-8655
          * CVE-2016-8658

    I have those CVE’s installed, and I didn’t have to reboot my system for them to be implemented.  Now my KVM host is patched, and I had 0 downtime to do it.

    There you have it. Let me know in the comments if you have any questions!


  • Deploying SwitchDev with MAAS

    Hello! So in this post, I’m going to show how to deploy a Mellanox switch with the latest firmware installed using Canonical’s Metal-As-A-Service, or MAAS. It’s actually pretty easy since with the latest release, 16.10, it has SwitchDev already enabled. There are just a few little things you need to do to make this deployment a much easier thing.

    The point of this article is so that you can install your Mellanox switch, connect it to your MAAS managed network, and deploy the switch and it will be ready to go.

    First thing you need to do is on the MAAS server, add a tag. This tag will make use of the “kernel_opts” meta tag so that we can use the console on the device. By default, MAAS wants to use tty and ttyS0, which is fine most of the time, but because Mellanox uses Console redirection, we have to include the baud rate and other settings otherwise we get no displayed output. This is easy enough. Log in to your MAAS server, and login to the MAAS CLI.

    NOTE: I like to export my API Key in my home directory so I don’t have to type it. I’ve seen some people make it an env variable so that they can just call it with a $APIKEY variable, either way, you can do this with the following command to make it easier to login:

    sudo maas apikey --username $USER > maas.apikey

    Now, you can login to the MAAS CLI:

    maas login default http://maas/MAAS `cat ~/maas.apikey`

    Now you can create the tag for the switch’s console:

    maas default tags create name='serial_console' comment='115200 serial console' kernel_opts='console=ttyS0,115200n8'

    You can add as many other tags and kernel_opts as necessary for each different switch you want to have managed by MAAS.

    Next, we have to download Ubuntu Yakkety Yak into MAAS if you don’t already have it. To do this, go to the Images tab in the MAAS WebUI, check the 16.10 checkbox and click Save Selection. After a few moments MAAS will download the image and you’ll be able to use it to deploy systems with. After you save selection, you can move on to the next step since by the time you’re done with it, MAAS will have downloaded the image and you’ll be ready to deploy.

    Now, you are ready to have the switch be provisioned by MAAS. Plug in the switch to a managed power supply that MAAS can manage. I use DLI’s PDU in my home lab with great success. Just make sure it is configured properly so that MAAS can use it. If you have any questions about this, leave it in the comments and I’ll reply back.

    Login to the PDU’s web interface and turn on the switch. Make sure you have the console cable connected to either a laptop or a serial concentrator that you can access to watch the device come up. You have to get into the BIOS to change the boot order. By default the Mellanox switch boots to the installed hard drive since it comes with ONIE pre-loaded on it. This will cause the system to never boot via PXE, which is what MAAS needs for it to work. When you get the AMI BIOS screen press CTRL-B, there is no prompt, you just press it and it will take you into the BIOS. Under the Boot tab, move the P0:InnoDisk to the third option and make sure that the Intel GB NIC’s are first and second. Then Save and Exit the BIOS and it will reboot the switch. You will get two PXE BIOS boot messages, one for each NIC, then the BIOS display again, then you get the familiar PXE Boot process. The device will hit MAAS and start the Provisioning. You will get no display on your console, but when it is finished, you will hear the fans over speed and get a red Fault indication on the device. Since MAAS tries to power down the device with the shutdown command, and there is no power off with a switch, it goes into a faulted state. From the PDU interface, shutdown the switch. Go to MAAS and you will see your device there in a NEW status. You need to adjust the power for it, so click on it in the MAAS WebUI and scroll down to Power. Put in the Power information for the device.

    NOTE: If you are using the DLI PDU, you will get no power indication. This is by design. For power status, you will have to look at the PDU web interface or look at the switch and verify it is on.

    Once you have the power setup for the switch, Click on Edit for the tags selection and put in serial_console (It should auto-populate as you type it) and click save. Now you are ready to commission the switch. From the Task pull down, select Commission. The switch will power up and start to boot up. NOTE: You may want to watch this since sometimes I have seen it change the boot order back to hard drive after the faulted state. If it does, just go back into the BIOS and change the boot order back to PXE. After you commission the device, this seems to not happen anymore.

    After commissioning, You will have a Ready state in MAAS. You are now ready to deploy the switch. Click on the switch, and select Deploy from the Task pulldown. You will be given the option of what Operating System and version to install on the device. Select Yakkety Yak and click Deploy. You can watch the device come up, install and deploy. After the reboot, you will have a deployed switch. You can login to the device via SSH with the ubuntu@device-name. I highly recommend adding a local user account with password on the device so that you have a way to get into the device locally if your management network ever goes down and you need to configure the device.

    The last thing you have to do is add udev rules so that the front panel gets the correct names for the device. This is just like with the switchdev in Ubuntu-Core on the switch. First you need the get the switchid. To do that run the following command:

    ip link show dev eth0 | awk '{print $9}'

    The output is the switch id. Note that since you will need it for the udev rule. Now we need to create it. To do that, login to the switch and run:

    sudo vi /etc/udev/rules.d/10_custom.rules

    and enter the following

    SUBSYSTEM=="net", ACTION=="add", ATTR{phys_switch_id}=="<switch-id>", ATTR{phys_port_name}!="", NAME="sw1$attr{phys_port_name}"

    <switch-id> is the value you got from the previous command/step.

    Reboot the switch and verify that the interfaces are named properly:

    ip link show dev sw1p1

    You should get the following:

    34: sw1p1: <BROADCAST,MULTICAST> mtu 1500 qdisc noop switchid 7cfe90f02dc0 state DOWN mode DEFAULT group default qlen 1000
    link/ether 7c:fe:90:f0:2d:fd brd ff:ff:ff:ff:ff:ff

    At this point you are ready to setup your device as you see fit using standard Linux commands.

    Please let me know if the comments if you have any questions.

    Thanks!


  • MAAS 2.0 and DNS

    Hello everyone! Been a while since I wrote a blog entry. I updated my network topology last night to accommodate for guest access and to separate my personal network from my work network to keep my video game consoles and my cell phones off of my external facing network and firewall them up better for more security. I decided during this time as well to revisit my DNS and Virtual Host machines.

    I was running ESXi 6 on one of my hosts that ran Ubuntu VM’s for this site, and my email server, and a couple other servers that I use to do my job. It became a hassle to keep it up and running on older hardware so I upgraded it to KVM and Ubuntu 16.04 and I decided that I would also upgrade my VM’s from 14.04 LTS to 16.04 LTS since I had the downtime.

    Anyways, I decided that I was going to use MAAS, or Canonical’s Metal-As-A-Service to provision my KVM’s and also get rid of my aging DHCP/DNS server that was running 12.04 and just move everything to MAAS. Sounds easy enough? Not so much.

    Building the KVM host was easy. I installed Ubuntu 16.04, selected OpenSSH server and Virtual Machine Host from the TaskSel and then after it was installed, ran sudo apt update && sudo apt upgrade, rebooted, and then ran sudo apt install ovmf qemu and modified my /etc/libvirt/qemu.conf to point to where ovmf was (basically just removed the comments from the file for those settings) and than ran systemctl restart libvirt-bin and was ready to go. I also modified my NIC interfaces to bridges.

    Now I was ready to build my MAAS server. I build a KVM with 2GB of RAM and 2 processors and 60GB of storage and added 2 NIC’s, one for each of my networks, one for my servers and external network, and one for my internal guest network. I installed a clean 16.04 LTS server, added OpenSSH and configured the interfaces for static addresses and ran update/upgrade and now was ready to install MAAS. I ran sudo apt install maas and was off and running. After it was complete, I ran sudo maas createadmin to create the admin account. I then logged in to maas by opening Firefox and browsing to my maas servers IP address and logging in. I click on my account in the upper right corner and went to Account, and copied my API key to a file called maas.key in my home directory on MAAS so that when I need to use the CLI, I can just cat maas.key instead of having to type the whole damn thing in. I then copied all my SSH keys to my account so that I can access my new nodes with my SSH key, and I then went to the Images tab to make sure it was downloading the 16.04 image, and did some minor settings to make sure it seen all my networks and put in my DNS forwarders.

    Next, it was time to setup DHCP. I clicked on the Network tab and clicked on the subnet I wanted to have DHCP. I set a dynamic reservation for my internal network starting at .50 and going to .200. I then clicked my other subnet and did the same thing there. I then went back to the Network tab and clicked the VLAN for each of my fabrics. Under the Take Action button, I configured DHCP for this network and was ready to go.

    I built my webserver as a KVM, and told it to PXE boot and attach it to the server network bridge on my KVM host. I powered it up and boom! MAAS found it, and enlisted the node. I changed its name, but realized it was not using my DNS name, but instead the MAAS default of “maas.” According to Canonical’s documentation on MAAS, you can change this from the WebUI. That would be helpful to tell a user how, but I’m not going to go there. In 1.9, it was as easy as clicking the domain name on the Nodes tab, but in 2.0, not so much. I ended up changing it from the MAAS CLI by ssh’ing into my MAAS server and running the following command to login:

    maas login maas http://maas/MAAS `cat ~/maas.key`

    I then ran maas maas domain update name=lucaswilliams.net and verified that it was updated with maas maas domains read and in the MAAS WebUI, it updated it as well.

    I then clicked on my new node, and commissioned it. After 10 minutes, it was commissioned and ready for deployment. I deployed, which I have to say, is a huge improvement over 1.9. In the node tab, under Interfaces, I could statically set my IP address, which I did, and then I clicked deploy, and from the pull down said 16.04 and it was off. About 20 minutes go by, and it’s done. Now, I ssh into my new server and I can login with my SSH keys from my various workstations and it works. I then go through the process of installing LAMP on the server and getting WordPress configured and recovering my site from my backup. Then I notice that I don’t have my CNAME records to access my server via www or wordpress. I go into research mode. How do I add CNAME’s to MAAS 2.0 DNS? Great news, according to Canonical’s maas.io site, you can do this, but once again, they don’t tell you how. After spending hours doing Google-Fu and on freenode asking around, to no avail, I decided “Whats the worse that can happen?” I start poking through the MAAS source on the dnsresource flags and relize that there is an option in the MAAS CLI for dnsresource-records. I look into that and low and behold, it tells you there I can create A, AAA, CNAME, MX, SRV, NS and TXT records. So, through about 2 hours of trial and error, I finally figured it out:

    maas maas dnsresource-records create fqdn=www.lucaswilliams.net rrtype=cname rrdata=webserver

    It shown the record in the DNS tab in MAAS as well. I was able to ping the new CNAME and it responded properly. You are able to see this page as a result of it working as well.

    I did the exact same above steps for my mail server as well, however, I had to create a MX record for it since it was failing its install step doing an MX record lookup. Great, how do I do that? Luckily, after only an hour of trial and error, I figured it out:

    maas maas dnsresource-records create fqdn=lucaswilliams.net rrtype=mx rrdata='10 mail.lucaswilliams.net'

    It updated in the DNS tab in MAAS and I could see all of these with the MAAS CLI. I was also able to add static servers that were not commissioned by MAAS into DNS via the CLI with the following command:

    maas maas dnsresources create fqdn=hostname.lucaswilliams.net ip_addresses=ip.add.re.ss

    Anything that is DHCP assigned will populate DNS automagically.

    And there you have it, a way to add MX and CNAME records so that you don’t have to do the research, or if you Google search it, hopefully you fall here.

    Let me know in the comments if this helps you or not, and let me know what else you want to know about.


  • My replacement phone is here, so why do I miss my Ubuntu phone?

    Hello everyone! I had my iPhone stolen at a baseball game I went to on July 3rd. Because it was a Sunday, and the next day was a holiday in the United States, I was told I would get my replacement on Tuesday the 5th. I couldn’t wait that long to be incommunicado, so I went to Best Buy with my gorgeous girlfriend and she bought me a $IMG_1044 2
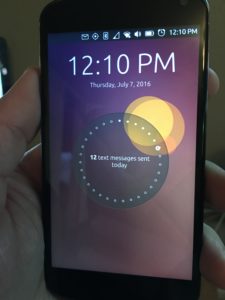
40 T-Mobile SIM card for my Ubuntu Phone. I plugged the SIM in and after going online to activate it, I had a working phone with unlimited text, calling and data. First thing I did, transfer all my contacts over to the Ubuntu Phone. Took a while since they were not in Google, so I had to convert the contacts from iPhone to Google, and then boom. I had them all.

    I also had to get used to the swipe motions. And I needed to update the phone. It was running OTA 9, which is what it updated to the last time I used this phone which was when I was in Spain for the Network Developers Conference back in February. So my phone updated to OTA 11, and, GPS broke. After reading online how to fix it, I had to flash my phone to another build. I did that, and now I had working GPS. Life is great again… sort of.

    So, I had to setup my email again, I used the Dekko Mail App that came on the phone to do that, which was quite easy to setup, in fact, it was easier on it than what I remembered on my iPhone mail app. Also, GMail was installed by default, so getting my work email was a snap, other than, I had no 2 factor authenticator for work. Luckily, Ubuntu has an app for that. In to my rescue came Authenticator, which all I had to do was work with our IS team to get me a temporary key, login and take a picture of my QR code on my screen with the app, and I was able to use it as my 2-factor device. So now I can use my phone for work and play and everything is all unicorns and cinnamon toast. Not quite. I needed an IRC app, which unfortunately, we don’t have Quassel as a client in our store. We have many other great options, which most I have used, but I have my own Quassel Core server and I just wanted to connect to that instead of connecting directly to our IRC servers. Plus I like looking back in the history to see what I may have missed of if my questions got answered by someone in another time zone while I was asleep.

    I figured, I would try to make it into an app and if it worked, upload it to the Ubuntu Store. So, after work yesterday, I downloaded the Ubuntu SDK IDE, took a crash course in CMake, and started working on porting just the Quassel Client to the Ubuntu phone. Needless to say, 6 hours later, and many beers, I had the code compiled for ARM, and it worked on ARM versions of Ubuntu, but I never could figure out how to make it into a Click package that the phone uses. I would have hacked on it some more, but then, today at 9:58am, my replacement iPhone came! So, I’m going to put this little side project on hold.

    So, I take my phone out, call Verizon using my Ubuntu Phone, which btw, works like a champ for everything else. Navigation, searching, Facebook, calls, texting, and best yet, you plug the phone into a monitor via the microUSB cable and connect a bluetooth keyboard and mouse to it, you have a desktop computer running Ubuntu Touch. BAD M$%^&ER F#@!%ING ASS!! That was by far, the coolest feature I had on this little Nexus 4 phone. My computer was in my pocket! I digress however, back on to my new iPhone. I get it, plug it in to my Mac, and it starts restoring my phone. 2 hours go by, it is finally done restoring, and updating everything and it is working like I never lost it. However, just in the 4 days I was using my Ubuntu Phone, I forgot how to use an iPhone! I got so used to swiping left to switch between running apps, to kill thIMG_4410
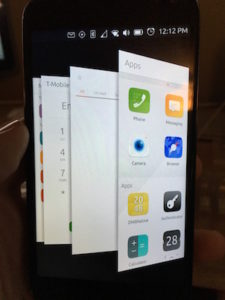
em, swipe them up (which, in my opinion, I think Apple stole from Ubuntu since they did it first… just sayin’), and then I could get to my Dock by swiping right and all my favorite apps are there, messaging, email, navigation, phone, calendar, the App Store, Scopes, which is what the main screen is on the Ubuntu phone. All my m
    edia, movies, interests, what is going on around me, all on my home screen for meto scroll through.

    So, what am I getting at? Well, I IMG_2839
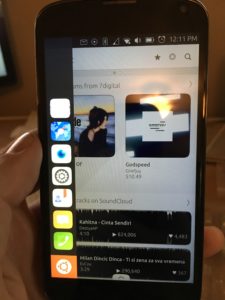
have to say, and not because I’m paid to, I actually am going to miss the Ubuntu Phone. I will still have it, and use it for testing and when I go over seas on trips since it works better then having to get a new SIM for my iPhone and having to have it unlocked for it to work, but I may actually flip for a new Ubuntu Phone when my contract with Verizon on my iPhone expires. It worked great as an emergency phone so that people could get a hold of me, and so I could keep in contact with friends and family. I’m hoping that by 2018, the Ubuntu phone matures, and hopefully will be available in the United States by a major carrier, but if not, I’ll definitely buy the phone, put a SIM in the phone and if the app doesn’t exist for it yet, I’ll build it.

    Lates all, I’m going to put my Ubuntu Phone back in its case until it comes to my rescue again.

  • Setting up a Virtual Router on KVM

    Hello everyone! Not sure how helpful this article will be, but I found it quite helpful for myself, and I just want to really just write down what I did so that if I have to do this in the future, which I have now done this about 16 times in the last 4 years, I have a reference.

    The premise of this article is mainly how to create a Linux router in a Virtual machine so that you have direct access to your VM network from any machine on your network.

    Many of us that have virtual home labs, usually will use network segmentation to separate our VM’s. For example, you may want to build an OpenStack lab, but not want it to be impacted by your home DHCP server or impact that network so that your kids or guests don’t mess around with it, so you’ll put it on a private network that only those VM’s can access, and perhaps use NATing for Internet access. While this does work, sometimes if you want to work on the systems, like if you spin up a Horizon server, you need a jump box on both your regular network and your internal network, which can be a hassle. Or, if you want to have some people have access to your environment, but don’t want them on the full network, this method works really well.

    Basically, I came up with this need about 4 years ago when I worked for a company that had very strict networking policies. I was testing OpenStack in our Hyper-V environment, but it had no access to the Internet. To get around this, I created a VM on the Hyper-V host that had 3 NIC’s, one that used the Hosts Network adapter that had access to the Internet for updates as the main egress port, another NIC that was used to manage VM’s from my workstation, and the last was an internal network that was going to be used for the intercommunications of the OpenStack nodes. ‘

    This VM I decided was going to run CentOS, since the company was a Red Hat shop, and I am quite a bit more familiar with Red Hat (even though as I write this, I found that as I have worked with Canonical for over a year now, I have forgotten some of the slight differences between the two). I managed to build a CentOS router, and it worked. I was able to get my machines in the private network out to the internet without having to NAT each one out the internet port that would have caused bottlenecks with the other VM’s, and the best part, I was able to connect directly to the VM’s from my workstation without needing a jump box, so I could share the OpenStack environment with my co-workers and they could test it.

    So, in my house, I am doing something quite similar. I have a KVM host that has 4 networks, my external network with my private IP addresses, my internal network on the 10.1.10.0/24 subnet with its own DHCP and DNS servers, and my private internal KVM network that is not NAT’d (192.168..2.0/24) and my KVM NAT’d network (192.168.122.0/24).

    Now, I know what your thinking, why didn’t I just use the NAT’d address range and all my machines would have access to the internet and I could download files and not have to do all this. Your correct on one part. The machines would have access to the Internet, and they have access to everything on my internal network, however, its one way only. I cannot on my workstation connect to those servers unless I use a jump box, which i do not want to do. Of course, I could have adjusted the settings in KVM network or even added the NAT’d routers IP address to my Routing table on my core router point the KVM host as the next hop for resolution. That I can do in my home lab, but what if I’m not running KVM? What if I’m running Hyper-V or VMware ESXi? While it is possible to do the same thing on the other Hypervisors, if you are not familiar with Powershell or the esx-cli command, you could spend hours on this, and potentially break the core networking on those hosts. This method is quick and somewhat painless.

    First thing you need to do is build a VM, with NIC’s on each network segment you want it to manage. In this example, I just put two, one on my Internal 10 network, and one on the non-NAT’d network. I installed CentOS 7 on this, minimal install, and I gave it a static IP on my 10 network, the gateway and DNS servers on that network, as well as the 192.168.2.1/24 IP address on the other interface but no gateway or DNS. After it was installed, I ran yum update to update the server and rebooted it. After the reboot, I enabled IPv4 forwarding in the /etc/sysctl.conf file by adding net.ipv4.ip_forward = 1 to it. Then run sysctl -p to make the changes take effect. Now we are ready to setup the firewall rules to allow IP masquerading and forwarding. Run ip a to see the devices and what networks they are connected to. Then, run:

    firewall-cmd --direct --add-rule ipv4 nat POSTROUTING 0 -o ext-eth -j MASQUERADE
    firewall-cmd --direct --add-rule ipv4 filter FORWARD 0 -i int-eth -o ext-eth -j ACCEPT
    firewall-cmd --direct --add-rule ipv4 filter FORWARD 0 -i ext-eth -o int-eth -m state --state RELATED,ESTABLISHED -j ACCEPT
    firewall-cmd --zone=trusted --add-source=192.168.2.0/24

    That is it on the server. Now, on your router, the main one, you need to add the static route to it so that it knows how to forward packets to your 192.168.2.0/24 network to it. Most home routers have this capability in the Advanced section usually labeled “Static Routes.” Here, enter in the network, 192.168.2.0 and the netmask or 255.255.255.0, and the next hop or source IP depending on how its labeled will be the IP address of your Virtual Router you just built, on the 10.1.10.0 network. Give it the static IP address you gave the router, and save the configuration.

    Now test that you can get to a Virtual Machine that is attached to the 192.168.2.0 network and is using your virtual router as its gateway.

    ping 192.168.2.2

    You should get a reply. Try to SSH to that machine and if you get it, your done. Last thing you need to do if everything test right, is make the firewall rules permanent, but typing the following:

    firewall-cmd --permanent --direct --add-rule ipv4 nat POSTROUTING 0 -o eno16777984 -j MASQUERADE
    firewall-cmd --permanent --direct --add-rule ipv4 filter FORWARD 0 -i eno33557248 -o eno16777984 -j ACCEPT
    firewall-cmd --permanent --direct --add-rule ipv4 filter FORWARD 0 -i eno16777984 -o eno33557248 -m state --state RELATED,ESTABLISHED -j ACCEPT
    firewall-cmd --permanent --zone=trusted --add-source=192.168.2.0/24

    And thats it. You can do this for any other network you build in your VM environment if you want to be able to access those machines from any other client.

    If you have any questions, or just want to leave a comment on if this helped you, leave ’em on the bottom.

    Thanks!

    [ayssocial_buttons id=”2″]

  • SwitchDev in Ubuntu-Core? Yes Please!

    Hello fellow Snappy and Networking enthusiasts. Welcome to my next blog post. This post is mostly to go over building SwitchDev into the Snappy Kernel using the latest kernel. It’s fairly straight forward if you have read my blog entry on how to build a custom kernel snap. I will touch on that a little here as well as go into some things I ran into during the initial build of this.

    First things first, make sure you are running on Ubuntu 16.04 with the latest updates and snapcraft (sudo apt install snapcraft -y), and do the necessary updates:

    sudo apt update && sudo apt upgrade -y

    One thing I did differently that I did in my previous kernel snap post (Success in building a Kernel Snap in snapcraft 2.8.4) is instead of downloading the kernel source from Ubuntu, I got the latest and greatest kernel from Kernel.org, (4.7.0-RC5) but I also had snapcraft download it via git and build. I also didn’t create a kconfigfile like last time, but instead, used the kbuild mechanism to run make defconfig and make oldconfig for me so that it was up to date. I’ll explain how I did this.

    The first thing I did was create a directory to work in called switchdev. mkdir ~/switchdev. I then copied my kernel config from my workstation, and name it 44.config. cp /boot/config-`uname -r` ~/switchdev/44.config

    I then changed my directory to cd ~/switchdev and ran snapcraft init to build the initial snapcraft.yaml file. I then modified the snapcraft.yaml file so it looked like the following:

    name: switchdev-kernel
    version: 4.7.0-RC5
    summary: SwitchDev Custom Kernel
    description: Custom Kernel for Snappy including SwitchDev
    type: kernel
    confinement: strict
    parts:
      kernel:
        plugin: kernel
        source: git://git.kernel.org/pub/scm/linux/kernel/git/torvalds/linux.git
        source-type: git
        kdefconfig: [defconfig, 44.config]
        kconfigs:
          - CONFIG_LOCALVERSION=-snappy"
          - CONFIG_DEBUG_INFO=n
          - CONFIG_SQUASHFS=m
          - CONFIG_NET_SWITCHDEV=y
        kernel-initrd-modules:
          - squashfs
          - ahci

    I then ran snapcraft pull . I ran pull because I have to put my 44.config in the kernel/configs directory so that make oldconfig has something to go against, and I have all the required drivers and modules for a stock Ubuntu kernel.

    By putting my 44.config and using defconfig, the kdefconfig parameter and the kconfigs parameter will be run to create an initial .config. Then the kernel plugin runs "yes" "" | make oldconfig to have an updated .config for building the kernel. So by pulling in all the files, I can then copy 44.config to the correct location:

    cp 44.config parts/kernel/src/kernel/configs/

    I then run snapcraft and grab something to snack on since it will take about an hour to build the kernel snap.

    Once completed, I have a kernel snap named switchdev-kernel_4.7.0-RC5_amd64.snap. I then run this kernel snap through the ubuntu-device-flash application to create a Ubuntu-Core image that I can then install onto a switch. You have to use the ubuntu-device-flash from people.canonical.com/~mvo/all-snaps/ubuntu-device-flash and make it executable (chmod +x ubuntu-device-flash)so that you can run this. You also need kpartx installed (sudo apt install kpartx) on your machine since it uses that to build the image. Once you have all of this, simply run:

    sudo ./ubuntu-device-flash core 16 --channel=edge --os=ubuntu-core --gadget=canonical-pc --kernel=switchdev-kernel_4.7.0-RC5_amd64.snap -o switchdev.img

    After that completes, burn your image onto your switch by either running it through your ONIE installer package creation tool, or by using dd or whatever other method for getting an Operating System on your whitebox switch.

    One thing I noticed once the system came up, was that none of the ports lined up with what the devices were called. Some were called eth0 to eth35, with some missing in between. Some were called renamed7-14, and one was named sw1_phys_port_namex. To fix this so that I could program the switch properly, I had to create a udev rules file. First thing I had to do was get the switchid. To do this, I ran

    ip link show eth8 | grep switchid

    and the value after switchid was what I needed. I then created /etc/udev/rules.d/10_custom.rules and put the following in:

    SUBSYSTEM=="net", ACTION=="add", ATTR{phys_switch_id}=="switchid", ATTR{phys_port_name}!="", NAME="sw1$attr{phys_port_name}"

    I saved the file and then rebooted the switch and when it came up, all the front panel ports were named sw1p1-sw1p32. I could then use the ip command to manage the ports on the switch and even set static routes and move packets around.

    Let me know how it goes for you and leave a comment if you need help!

    Thanks!

    [ayssocial_buttons id=”2″]

  • OpenVPN Server on Ubuntu 16.04

    Hello everyone! Hope everyone is having a good start to summer. I’ve been extremely busy as usual, but I had a moment of time to start this new HOWTO, How to Install OpenVPN in Ubuntu 16.04 so that you can connect to your home machines or browse the Internet safely from anywhere in the world. If you don’t know what a VPN, or Virtual Private Network is, this is a simple answer. Its a Network that allows encrypted information between the VPN server and your machine so that it appears like it is on the same network as the rest of your home equipment, but are over the internet. This is useful if you are working remote and need access to your servers at home, but don’t have them connected directly to the Internet with their own IP address.

    The main reason I am writing this, is because I had to setup a VPN connection to my home lab so that my co-workers could connect to the various network equipment I have in my lab and test on this equipment. So I setup a VPN so that they can connect into my lab, get on the switches, get on the console concentrator, and power up, power down, and work on the switches remotely. It’s extremely secure since I have to give the user a certificate to connect to my VPN server and I control them so that if they don’t need access anymore, I kill that certificate in my Certificate Authority and they can no longer login on my network.

    This HowTo is going to show how I setup OpenVPN on Ubuntu 16.04, and secured the system using UFW so that only 2 ports are exposed to the world to limit the attack surface of my VPN server.First thing I did was install Ubuntu Server 16.04. I used Virtual Machines quite extensively, so that is how this started. I created a VM, made sure to set it’s network interface to my external IP pool, gave it 1GB of RAM and 1 vCPU, 16GB of storage and installed Ubuntu on it. The only other software I installed was OpenSSH-Server and that was completed. I then modified the /etc/network/interfaces file so that it had a static IP address, gateway and DNS server information, subnet range, and what the device was called. This is important since it will come into play when you are setting up the the VPN server so that it knows what to tunnel through for the firewall rules. In this example, the device is ens160, but it will be whatever your system calls it, typically this is eth0.

    After the server was installed, I ran the following to make sure it was all up to date and had the latest repositories:

    sudo apt update && sudo apt upgrade -y

    I reboot the server after this so that it used the new IP address, and was running with the latest updates.

    I than ran sudo apt install openvpn easy-rsa to install the required binaries I needed.

    I than ran make-cadir ~/openvpn-ca. This command creates the minimum config files and sources so that you can build a Certificate Authority (CA) on the system. This is required to create the certificates that will be used by the server and the clients to connect and verify the systems so that they trust each other.

    Once that completes, change directory to the CA folder cd ~/openvpn-ca, and modify the vars file vi vars. Go to the section that looks like this:

    export KEY_COUNTRY="US"
    export KEY_PROVINCE="CA"
    export KEY_CITY="SanFrancisco"
    export KEY_ORG="Fort-Funston"
    export KEY_EMAIL="me@myhost.mydomain"
    export KEY_OU="MyOrganizationalUnit"

    Modify these variables for your needs. Also, find the variable KEY_NAME and change it to the name of your server.

    export KEY_NAME="server"

    Now, you are ready to build the CA. Run source vars and you should get the following output:

    NOTE: If you run ./clean-all, I will be doing a rm -rf on /home/wililupy/openvpn-ca/keys

    Go ahead and run ./clean-all to make sure that the environment is good to go. Now we are ready to build the CA. Run the command ./build-ca.

    You will be given a bunch of options, most of which you already set in the vars file, so just hit enter to accept them.

    We now are ready to create the server certificate, the key and encryption files. This is done with the command ./build-key-server server where server is the name of your VPN server. Once again, it looks at the vars file and uses those for the defaults, and then it will have two prompts you need to answer. The first one is:

    Certificate is to be certified until June 13 15:26:11 2026 GMT (3650 days)
    Sign the certificate? [y/n]:y

    The second one is:

    1 out of 1 certificate requests certified, commit? [y/n]y

    It will update the database and now we are ready to generate the encryption key. Use the command ./build-dh to do this. It takes about 2 minutes for this command to complete. You will see …. and * while it randomizes. Lastly, we need to generate the HMAC signature. To do this use the following command:

    openvpn --genkey --secret keys/ta.key

    Now we are ready to build the client certificate so that you can connect to your VPN server. While still in the ~/openvpn-ca directory, and while you are still sourced to vars, run ./build-key client where client is the hostname of the client machine/username. Make sure you say Y at the prompts to sign the certificate and commit the certificate.

    You are now ready to copy the required files to the /etc/openvpn directory so that we can configure openvpn to run.

    Go into the keys directory:

    cd ~/openvpn-ca/keys and copy the certificates and keys to /etc/openvpn

    sudo cp ca.crt ca.key server.crt server.key ta.key dh2048.pem /etc/openvpn

    We are now ready to copy the example server.conf file to the /etc/openvpn directory so that we can configure the server. You have to uncompress it first:

    gunzip -c /usr/share/doc/openvpn/examples/sample-config-files/server.conf.gz | sudo tee /etc/openvpn/server.conf

    Now we have to modify the file so that it works with our environment.

    sudo vi /etc/openvpn/server.conf

    Search for redirect-gateway and remove the ; to uncomment the setting so that it looks like this:

    push "redirect-gateway def1 bypass-dhcp"

    Then below that is the “dhcp-option DNS” settings. Uncomment them and set them to your DNS servers or leave them as the defaults. I changed them to my internal DNS so that users can use my internal names of my systems and get to them easier than searching around for IP addresses. Next, uncomment the HMAC section by searching for tls-auth and just under that variable, add key-direction 0. Last, search for user and uncomment user nobody and group nogroup so that the service knows who to run as.

    Now we have to allow the system to do IP Forwarding and modify the Firewall to secure the system. First, modify /etc/sysctl.conf and uncomment net.ipv4.ip_forward=1 and then save the file and run sudo sysctl -p to make the changes take effect.

    Next, modify the /etc/ufw/before.rules so we can setup Masquerading for the VPN server. Right after the #  ufw-before-forward option, enter the following:

    *nat
    :POSTROUTING ACCEPT [0:0]
    -A POSTROUTING -s 10.8.0.0/8 -o ens160 -j MASQUERADE
    COMMIT

    Remember when I said to remember your network device from when we were setting up the static IP of the server? After the -o option in the before-rules file, that is where the name of your device goes. Save the file. Now we have to set UFW to forward by default. Modify the /etc/default/ufw file and find the DEFAULT_FORWARD_POLICY and set it to "ACCEPT". Save this file and now all we have to do is allow ufw the openvpn port and protocol and enable the ssh variable:

    sudo ufw allow 1194/udp
    sudo ufw allow 22/tcp

    Now we need to disable and re-enable ufw so that it will read the changes in the files we modified:

    sudo ufw disable
    sudo ufw enable

    Now we are ready to start OpenVPN. Since our configuration is called server.conf, when we start openvpn, we will tell it @server so that it will use that configuration. Nice this about openvpn, is that we can have multiple configuration, and multiple instances of the VPN server running, all we have to do is trail @configname after it and it will run that config. To start openvpn, run the following command:

    sudo systemctl start openvpn@server

    Check that it is running by running sudo systemctl status openvpn@server and look for the Active: active (running). If everything looks good, set it to run at startup by running sudo systemctl enable openvpn@server.

    Now we are ready to setup the clients. First thing I did was create a new directory for the client files so that I could scp them to my colleagues and my different machines and devices (OpenVPN works on Windows, MacOSX, Linux, iPhone, and Android)

    mkdir -p ~/client-configs/files

    Also, because there will be multiple keys in this folder for different machines, I locked it down so that only I had access to that folder: chmod 700 ~/client-configs/files.

    Next, I copied the example configuration for clients to this location:

    cp /usr/share/doc/openvpn/examples/sample-config-files/client.conf ~/client-configs/base.conf and then edited the file to meet my client needs.

    First thing is to search for remote in the file and change the server_IP_address to the public IP address of your VPN server. Next uncomment the user and group variables by deleting the leading ‘;’.

    Next, search for the ca.crt and client.crt sections and comment them out with the ‘#’, and finally, add the key-direction 1 in the file somewhere so that it knows how to use the keys. Save the file and you’re done.

    Now, I found this really cool script at https://www.digitalocean.com/community/tutorials/how-to-set-up-an-openvpn-server-on-ubuntu-16-04.

    #!/bin/bash
    
    # First argument: Client identifier
    
    KEY_DIR=~/openvpn-ca/keys
    OUTPUT_DIR=~/client-configs/files
    BASE_CONFIG=~/client-configs/base.conf
    
    cat ${BASE_CONFIG} \
        <(echo -e '') \
        ${KEY_DIR}/ca.crt \
        <(echo -e '\n') \
        ${KEY_DIR}/${1}.crt \
        <(echo -e '\n') \
        ${KEY_DIR}/${1}.key \
        <(echo -e '\n') \
        ${KEY_DIR}/ta.key \
        <(echo -e '') \
        > ${OUTPUT_DIR}/${1}.ovpn

    Create a file called make_config.sh and paste the script into that file. Save the file, then make it executable by running chmod 700 ~/client-configs/make_config.sh.

    If you remember, we created a client certificate and key previously, using the build-key client command. This created a client.key file in the ~/openvpn-ca/keys directory. We are now going to build a configuration for the VPN that uses these keys. Make sure you are in the ~/client-configs directory and run ./make_config.sh client where client is the name of the client configuration you are creating. The name should match what you entered in the build-key command previously. This will generate a file called client.ovpn which needs to be copied to the client. I use SCP or SFTP to transfer the files between Linux and MacOSX, but for Windows or IOS or Android, getting the certificate file on the system may be a little trickier. For Windows, I use FileZilla or WinSCP. Just login to the VPN server and copy the ovpn file to your home directory on the system.

    In Ubuntu Desktop 16.04, make sure you have OpenVPN installed, (sudo apt install network-manager-openvpn-gnome) open up Network Manager, go to VPN Connections, Configure VPN, and click Add. From the drop down, select Import a saved VPN configuration… and browse to your .ovpn file. Select Open and verify that everything looks right, the vpn server’s IP address, the name of the certificates, and click Save. Now you are ready to test. Connect your new VPN and verify that you connect successfully. Check your network devices for the new tun0 device and IP address of 10.8.0.x (ifconfig tun0). Try to connect to a server in your internal network and verify that everything is working as normal.

    And thats it. It really isn’t that difficult to setup. If you have any questions, or if this blog helped you in anyway, let me know. I like to think that I’m helping someone out there.

    Thanks!

    [ayssocial_buttons id=”2″]

  • Kids of the future?

    Funniest thing I heard tonight in IRC (yes, I know I’m old but we use this for work, way better then private chat programs, it allows for us to interact with customers directly and collaborate and come up with solutions quicker) there was an argument happening about solving a problem and one of the put downs was “Your parents met on Everquest!” And he replied back, “Yeah, they did and and I met my wife on Xbox live!” Think about that for a second. Video games and interactions online are creating the future humans on this planet. While some people might say that’s messed up, is it really? We used to meet people in bars, or by totally chance, but now people can meet doing the thing we like, and what we like to do, play a video game with death match killing someone. Go online, shoot them in the face with a gun, tea bag their corpse, and then ask if they want to be friends after the times up. Next thing you know, you have something in common with them besides that you like to kill zombies and kick field goals, but you like hiking and fishing and surfing.
    People say that I don’t want my kids playing video games because they are not interacting with kids. I say, sit down, and watch your kids play. My son, who has Aspergers, is a hero online. People look up to him online. He gets other kids asking him how to do things. He’s “normal” online. No, he’s normal all the time, he’s just judged differently online.
    So, before you say that the Internet is bad, and online is bad, take a step back, and realize, your parents could have met killing each other in Doom. ????

    [ayssocial_buttons id=”2″]

  • Success in building a Kernel Snap in snapcraft 2.8.4

    Wow! Talk about a crazy week. And it couldn’t have been better. After many days trying to get a working kernel in Snappy Ubuntu Core with customized Kernel Modules built against the kernel into a single snap bundle was easy is like saying giving a cat a bath is easy (I did that today as well, waiting for the kernel to finish building…)

    Anyways, this blog post is about how I managed to get it working using snapcraft 2.8.4, running on Ubuntu 16.04, with kernel 4.4.0-21-generic from the Ubuntu kernel repository, and building the modules and then depmod’ing them and making sure they get put into the final snap.

    First thing I did, download snapcraft. Easy to do now that it is in the main repository for Ubuntu 16.04. All you do is sudo apt update then sudo apt install snapcraft -y. Once that is complete, then you can run snapcraft init and you have a blank snapcraft.yaml file waiting for you to tell it what you are going to build. Below is an example that I used for my kernel snap:

    name: custom-kernel
     version: 4.4.6
     summary:  custom kernel
     description:  custom kernel for Snappy
     type: kernel
     parts:
        kernel:
          plugin: kernel
          source: .
          kconfigfile: 4.4-config
          kconfigs:
            - CONFIG_SQUASHFS=m
          kernel-initrd-modules:
            - squashfs
            - ahci

    I then ran sudo apt source linux-image-`uname -r` to get the latest kernel source that is running on Xenial. After that, I copied my snapcraft.yaml file to the location I downloaded the kernel source files to and copied the default kernel config file from /boot/config-4.4.0-21-generic to the kernel source directory and renamed it to 4.4-config. I then ran snapcraft build and after two hours, and giving my cat a bath, it was done. I was then able to build my custom kernel modules against these headers so that I knew they would have the same symbols for it. All I did was modify my makefile so that instead of it looking in /lib/modules/`uname -r`/build for my modules, I pointed it to /home/wililupy/linux-4.4.0/parts/kernel/build and modified the kernel version to 4.4.6. I then ran make all and it built my *.ko files I needed.

    I then copied the *ko files to /home/wililupy/linux-4.4.0/parts/install/lib/4.4.6/extra (I had to create the extra directory mkdir -p extra) and then ran depmod -b ~wililupy/linux-4.4.0/parts/install 4.4.6 to update the modules symbols for the compiled kernel. I then ran  snapcraft snap. It then built my kernel.snap file. I then ran ubuntu-device-flash, which you will need to download from here. Run sudo ./ubuntu-device-flash core 16 --channel=edge --kernel=custom-kernel_4.4.6_amd64.snap --gadget=canonical-pc --os=ubuntu-core -o custom-snappy.imgand you will have your custom image that you are now ready to install on your device.

    Since I work heavily in the Whitebox switching area, I use ONIE to install my software on whitebox switches. Read up on how this works from their Github or if you want, ask me in the comments below.

    Happy Hacking!!

    [ayssocial_buttons id=”2″]

  • Had to rebuild

    Hello,

    Don’t think too many of you noticed this site being down, but I had to rebuild it. I had a firewall issue that had to be corrected, and during the initial configurations, all the moving pieces wouldn’t play nice, so it was easier to rip it all down and start over from scratch.

    So, now that I am all back, be looking forward to some randomness of information, mostly for my own need, but if you find it helpful, let me know in the comments and I’ll keep up with it.