
Forward
Ubuntu Core is a snap-only, lightweight version of Ubuntu. The kernel, the root file system, and the snap daemon are all packaged and operated as snaps compared to the traditional layout of a Linux distribution. Ubuntu Core is designed around IoT devices due to its lightweight, transactional updates and security. Deployment usually happens in the factory of the device and the software is “flashed” on to the storage medium.
MAAS, or Metal-As-A-Service, is a Canonical-based application that typically runs on a server or Top of Rack (ToR) switch that is used to manage and deploy various operating systems like Windows Ubuntu or Red Hat Linux and onto those bare metal servers. It is a way to treat bare metal servers as cloud services where you can manage it as easily as managing cloud instances.
With Ubuntu Core 18, cloud-init, which is the provisioning and configuration piece of Ubuntu, comes built-in. MAAS makes use of cloud-init to set up network access, initialize users, copy ssh keys to the device and to set up storage and partitions.
This document will explain how to set up MAAS to be able to deploy Ubuntu Core to devices, which devices are compatible with MAAS so that it can be used to deploy and what customizations have to be done to the Ubuntu Core image to have seamless integration with MAAS and the target devices.
MAAS Setup
Installing MAAS is fairly easy. There are two methods of deployment: you can either install it from the main repo in Ubuntu Server after the server has been deployed, you can install MAAS during the initial installation of Ubuntu Server, or you can install it via snap packages on any Linux distribution capable of running snaps. This document will cover installing MAAS from the MAAS/next repository that is the beta next release of MAAS (2.5) in Ubuntu 18.04.2. More information on other installations can be found here.
Deploy Ubuntu Server
- Download the latest version of Ubuntu Server 18.04.2 by clicking here.
- Burn the media to a USB or DVD and install Ubuntu Server by following the Installation Guide located here.
- Once Ubuntu Server is running, do an update to make sure you have the latest versions of the software:
sudo apt update && sudo apt upgrade -y - Once this completes, you need to add the MAAS/next ppa to your apt.repos:
sudo apt-add-repository -yu ppa:maas/next - Now, install MAAS on the server:
sudo apt install maas -y - Once MAAS finishes installing, you need to configure an admin user account. Use the following command to do this:
sudo maas createadmin --username=admin
Enter a password and email address for the admin user and now you are ready to login to the web UI. However, we have one small step left to do since the next following steps will require command line use. - Now, we need to save the API key to login to the MAAS command line. This is how we will upload the Ubuntu Core image to MAAS so that it can be deployed on devices. Use the following command to save the key:
sudo maas apikey --username=admin > ~/apikey
This will save the API key to your home directory asapikey. This will be used later when we actually upload the Ubuntu Core image to the server.
Configuring MAAS
- Now, we need to finish setting up MAAS. Login to the web UI by opening a browser window to:
http://maas.server.address:5240/MAAS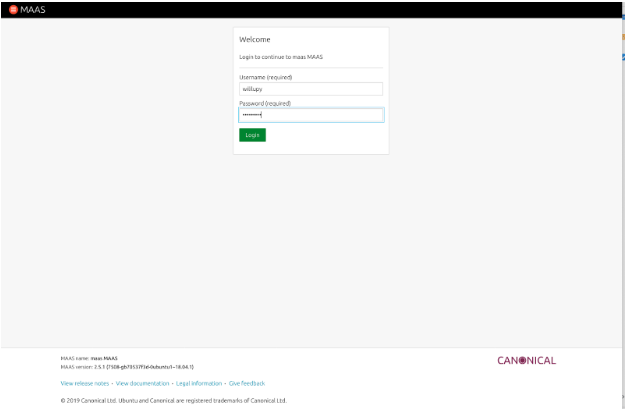
- After you login, you are presented with a screen asking for DNS forwarders. Here you can add your own internal DNS servers, or use the public ones. You can also leave it blank, but I recommend at least entering 8.8.8.8.
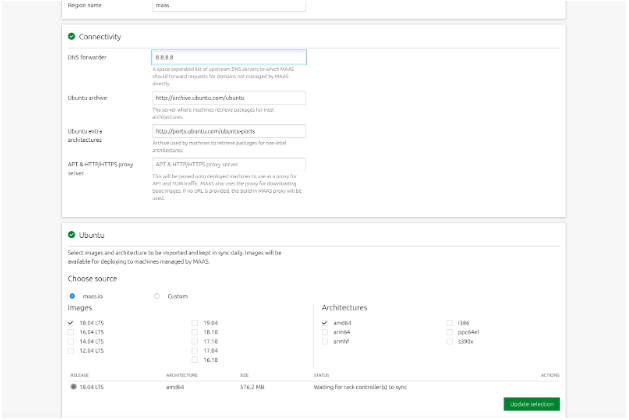
You also need to have at least one image downloaded and installed, By default MAAS downloads the X86_64 version of Ubuntu Server 18.04. You can add others if you want, but this should suffice for now. - Scroll all the way to the bottom and click Continue.
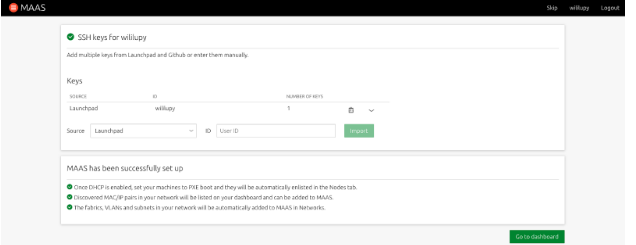
- On the next screen, import any other SSH keys you want MAAS to be able to provision to servers/devices and then click import and then click Go to dashboard to go to the Main MAAS UI.
- From the main dashboard, click the Subnets tab. We need to setup DHCP on the network that will be managing the servers and devices.
- Click on the VLAN for the subnet you want to manage DHCP for. Click the ‘untagged’ label.

- From the Action button, select Provide DHCP and configure the address pool and the gateway for the subnet and then click Provide DHCP button.
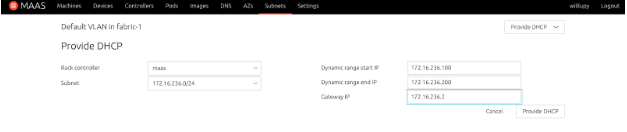
- MAAS is configured now to manage and deploy images that are connected to the subnet that you just configured. You can click on the Machines tab and you are ready to start enlisting, commissioning, and deploying Nodes.
OPTIONAL: Setup MAAS as a Router using UFW
This step is optional. If your network that is managing the subnet has a router or a policy that routes traffic to the internet or other networks, this step can be bypassed. If you are testing on a Canonical OrangeBox this can be skipped since the mini switch in the box has routing capabilities built in. However, if you are running this in a VM environment or just testing locally on a subnet you created in your home lab, this will help get your clients you deploy with MAAS to get to the internet and work properly. I used UFW since it is built in to Ubuntu and fairly easy to configure, just a lot of rules for the various ports that MAAS uses to do its “magic.”
Below is a list of ports that MAAS uses:
| Port | Use |
|---|---|
| 7911/TCP | MAAS |
| 22/TCP | SSH |
| 53/TCP and UDP | DNS |
| 3128/TCP | iSCSI |
| 8000/TCP | Squid |
| 5240/TCP and UDP | MAAS |
| 5247/TCP and UDP | MAAS |
| 5248/TCP | MAAS |
| 5249/TCP | MAAS |
| 5250/TCP | MAAS |
| 5251/TCP | MAAS |
| 5252/TCP | MAAS |
| 5253/TCP | MAAS |
| 67/UDP | DHCP |
| 68/UDP | DHCP |
| 69/UDP | TFTP |
| 123/UDP | NTP |
| 5353/UDP | Multicast DNS |
| 5787/UDP | MAAS |
Now, for the procedure to enable NAT and forwarding in MAAS using UFW.
NOTE: It is much easier to work with the firewall as root. You can switch to root using the following command:
sudo -s
- Setup the forwarding policy for UFW by modifying the
/etc/ufw/defaultand change the following:DEFAULT_FORWARD_POLICY=”ACCEPT” - Uncomment
net/ipv4/ip_forward=1from/etc/ufw/sysctl.confto allow ipv4 forwarding. You can also uncomment the ipv6 if you need it. - Next, modify the /etc/ufw/before.rules to create the NAT table and the source network and interface by adding the following BEFORE the filter rules:
# NAT table rules *nat :POSTROUTING ACCEPT [0:0] # Forward traffic through the external interface on host -A POSTROUTING -s 172.16.236.0/24 -o ens33 -j MASQUERADE # Don’t delete the ‘COMMIT’ line or this nat table rules # won’t be applied COMMIT - Now we are ready to create the firewall rules to allow connectivity to MAAS and the various services. Below are the commands to do this:
ufw allow ssh ufw allow bind9 ufw allow ntp ufw allow tftp ufw allow 67:68/udp ufw allow 7911/tcp ufw allow 3128/tcp ufw allow 8000/tcp ufw allow 5240/tcp ufw allow 5240/udp ufw allow 5247:5253/tcp ufw allow 5247:5253/udp ufw allow 5787/udp - Now we can start the firewall and test:
You will get a list of the firewall rules. You can connect a device to your internal network managed by MAAS, and try to ping Google.com or 8.8.8.8 and verify that you get a return echo. If that is all working properly, then you have successfully setup MAAS to act as a router for clients on the managed network.ufw enable ufw status
Ubuntu Core Image Setup
Ubuntu Core 18 can deploy from MAAS out of the box. However, there is currently a bug in console-conf where if MAAS manages the device and configures the network, console-conf will fail on the network setup and go into a loop where you cannot configure the device. You can still manage to ssh and login using your keys that are installed to the device via MAAS managed keys, but you cannot login locally on the console of the device because it does not know it is fully configured.
There are also some limitations of what you can configure for the device through MAAS. For example, you cannot change the filesystem and partition layout since the image is basically just dd’d to the device, so after installation and first boot, Ubuntu Core resizes the partition to fit the device, and installs the correct partitions to be able to boot the device up properly. The only parts that Ubuntu Core uses from cloud-init is the network configuration and it creates a user named Ubuntu on the device, and then copies the stored SSH keys for the MAAS user deploying the device onto the device for remote login/administration.
To get around the previous mentioned bug, before we install the image into MAAS, we have to add a file so that it doesn’t run console-conf after first boot. The following procedure will go into this in detail.
Download Ubuntu Core 18 and upload it to the MAAS Server
- Download the latest version of Ubuntu Core 18 from here.
- SCP the image to the MAAS server:
scp ubuntu-core-18-amd64.img.xz maas.server.address:~ - SSH to the MAAS server:
ssh maas.server.address - Login to the MAAS CLI using the APIkey you created previously:
maas login admin http://localhost:5240/MAAS `cat ~/apikey` - Upload the image to MAAS:
maas admin boot-resources create name=ubuntu-core/uc18 \ title="Ubuntu Core 18" filetype=ddxz \ content@=ubuntu-core-18-amd64.img.xz architecture=amd64/generic - Verify that the image uploaded by going to the Images tab in MAAS UI and at the bottom you will see Custom Images, and the image will be there:

- You are now ready to deploy Ubuntu Core to a device managed by MAAS.
Implementation
So now we are ready to deploy Ubuntu Core 18 on to a device. First, make sure that your device is connected to the network, there is no OS installed on the device, and that it is setup to PXE boot. Make sure that you connect the power to a managed UPS outlet, or if it has a remote poweron/off ability, that you have the credentials or settings and that they are compatible with MAAS. For this demo, I used an Intel NUC, which uses Intel AMT for the power management. I configured it on the NUC in the BIOS and then entered in those settings when I got to that step.
MAAS has three phases when it acquires new devices. First, the device needs to be powered up and MAAS will automatically detect a new device on the network when it asks for a DHCP address. MAAS will boot up an ephemeral image and probe the device for network connectivity, and power management, and if it can, power off the device, and then add it to the MAAS database. This is called “Enlistment.”
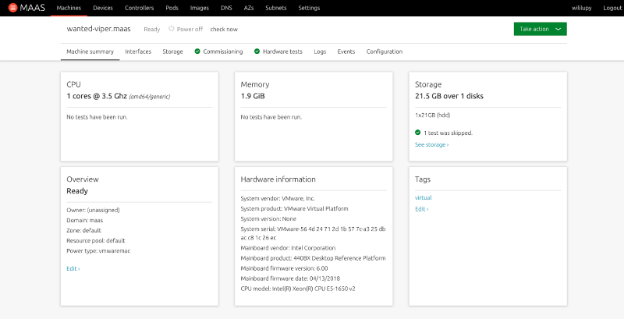
Once this step is completed, from the MAAS UI, the operator can then “Commission” the device. This boots up an ephemeral image on the device and probes all the hardware, gets more detailed information, and can perform tests on the device and also upgrade firmware if required. Once this step is completed, the device is ready to be Provisioned, or deployed.
To provision a device, once it is in the Ready state, you can select it from the Machine tab in MAAS, and from the Action button, you select Deploy.
Below will be the steps to enlist, commission and deploy Ubuntu Core 18.
Enlistment
- Connect the device to the network being managed by MAAS. Make sure it is fully configured to use remote power up and down.
- Power on the device. You can either connect to the console of the device or install headless and watch MAAS. Once the device is enlisted, it will show up in the Machine tab.
- Doing this sometimes will cause the system to not know the power type to use. You may have to configure the power for the device for remote power on. For Intel NUC’s, they use AMT, but some make use of IPMI. You can also select Managed PDU’s as well. If it is a VM, you can use KVM or VMware. VirtualBox is not supported.
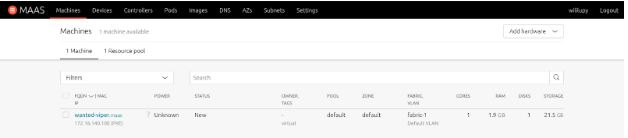
- When enlistment is finished, you will get the following in the Machine tab in MAAS:
- If enlistment couldn’t detect the power type, you will have to manually update it. Select the node.
- Click on Configuration
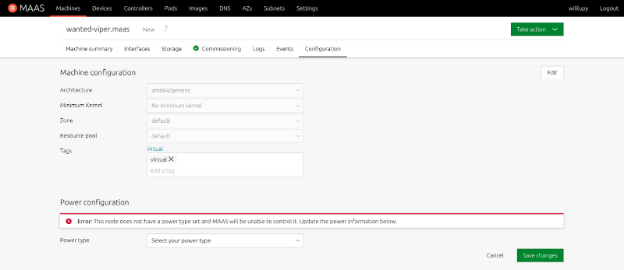
- From the Power type pull-down, select the power type that the device uses and enter all the applicable information. If it is entered correctly, you will get the following indication on the machine:

Commissioning
When the device is in a “New” status, it needs to be commissioned before it can be deployed. From the Machine tab screen, perform the following:
- Select the device from the Machine tab.
- From the Take action button, select Commission.
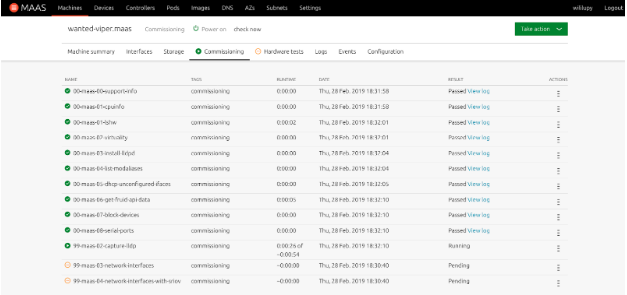
- You can watch the hardware test and the commission scripts run from the respective tabs in the Machine view in the MAAS UI:
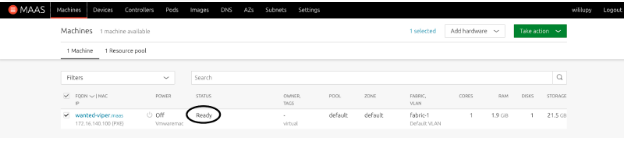
- Once all the hardware tests and commission scripts have passed, the machine will be powered off and put in the Ready state.
Deployment
The device is now ready to have Ubuntu Core 18 installed. Follow this procedure for deploying Ubuntu Core.
- From the Machine tab in the Web UI, select the device you want to deploy Ubuntu Core to.
- From the Machine view of the device, you will see various tabs. These tabs let you customize the installation of the device.
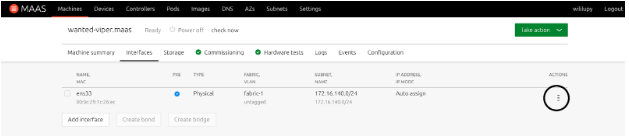
- Click on the Interfaces tab. This tab lets you configure the network address of the device. To customize it, click the Action icon highlighted in the following picture and select Edit physical.
- The Storage tab does not function with Ubuntu Core, so any selection you make will not apply to Ubuntu Core. This is due to how Ubuntu Core is installed on the device. Since it is just dd’d on to the device, it will auto partition on first boot so that Ubuntu Core will work as designed with the writable partition and the boot/EFI partitions.
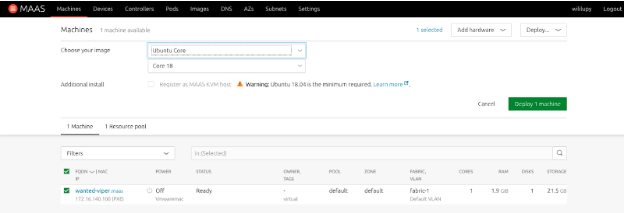
- From the green Take action button, select Deploy
- From the Choose your image pull down, select Ubuntu Core.
- Make sure that Core 18 is the image that it will install.
- Select Deploy Machine
- Once deployment is finished, the device will remain powered on and have Core 18 in the status. You can now SSH to the device with the user
ubuntu.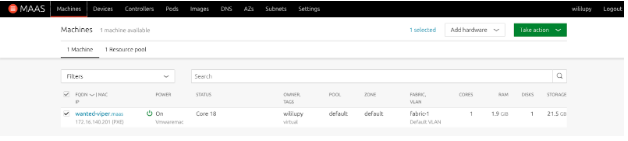
NOTE: Even though the device is saying that it is deployed, if you look at the console of the device, it will be at the first boot state. This is a bug in Console-conf where even though the device is configured, console-conf is not aware of this. If you try to configure the device, it will fail at the network setup with the following error: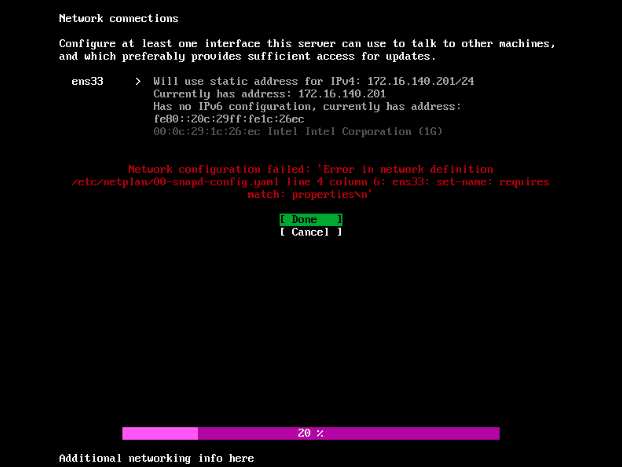
If you select Done, you get back on this screen. If you select Cancel, you end up on the main configuration screen and you can’t move past this. To work around this, we need to let console-conf know that the device is already configured.
- SSH to the device.
ssh ubuntu@device.name - A file needs to be placed in
/var/lib/console-confcalledcomplete.sudo touch /var/lib/console-conf/complete - Reboot the device and when it comes back online, you will be presented the normal login screen on the console. However you cannot login via the console due to security of Ubuntu Core 18.
Conclusion
With this document, you can now deploy Ubuntu Core 18 to devices that are managed by MAAS. I hope that this has been helpful and informative.
Leave a Reply